- Messages
- 612
- Location
- Missouri
Well its not really a "humidifier", but it acts like one.
Purpose: Raises the humidity levels in the enclosure without using a pesky spray bottle. I work long hours mostly days/nights and I dont have to much time to be misty the cages to get the humidity up. In the past, I used this same idea, but I decided to modify that idea to create something slightly unusual.
I call it... The Lazy Man's Humidifer
Complexity: 3 out of 10 stars
Materials:
1 - $5 Generic Aquarium Air Pump
1 - $1 8' Clear Aquarium Hose
1 - $5 Digital Outlet Timer
1 - $2 4 way Aquarium Gang Valve
1 - $1 Epoxy Glue
1 - Free Coke bottle (Drink the coke obviously haha, 24 oz., 1 liter, or 2 liter works great. If you have a big cage, go for a milk jug or bigger)
So basically heres how it works...
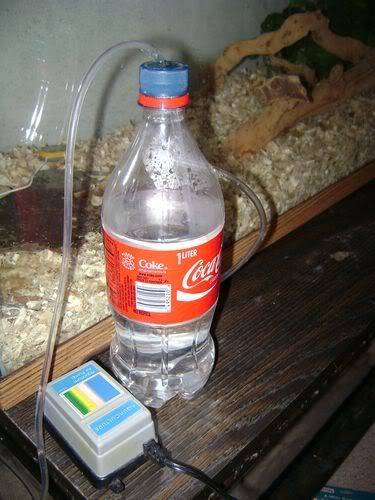
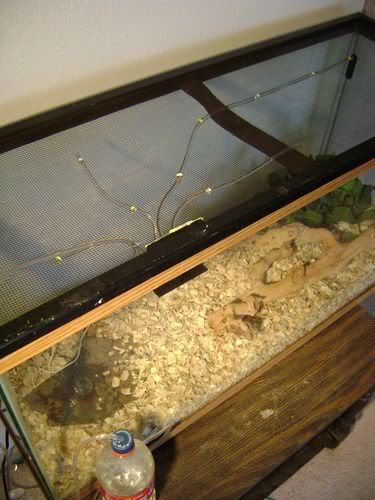
Heres the coke bottle hooked up to the aquarium pump. The air thats being pushed through the tubing from the aquarium pump goes into the coke bottle. Theres an outlet hole in the top of the bottle. Since the air has no where to go, it forces the water up through the top hose into the cage.
Directions: Take an ordinary coke bottle. Drill 1 hole in the top lid of the bottle, then 1 more hole in the side of the bottle preferably towards the top. (As shown). Feed a piece of tubing into the top of the cap so that the tubing goes into the bottle all the way to the base of the bottle. The tubing coming from the cap has to touch the bottom of the bottle because thats where the water will be pushed up through the tubing.
Next, take another piece of tubing in feed it into the side of the bottle. The tubing going into the side of the bottle doesn't matter if its touching the bottom of the bottle like the top, or if its just a few inches inside of the bottle. This is the piece where the air will be constantly fed into the bottle.
Mix up your epoxy glue and glue the tubing around the 2 holes so that theres no air holes. Let dry for a good 15-30 mins.
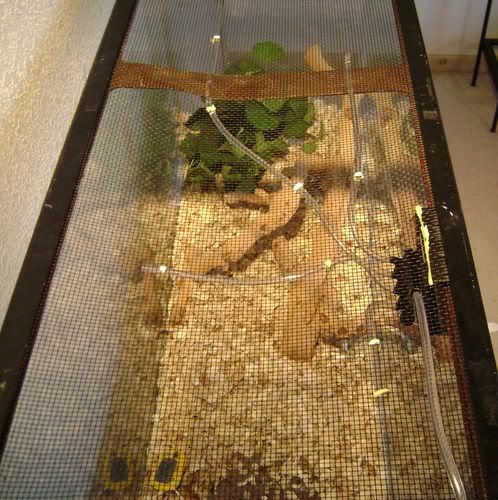
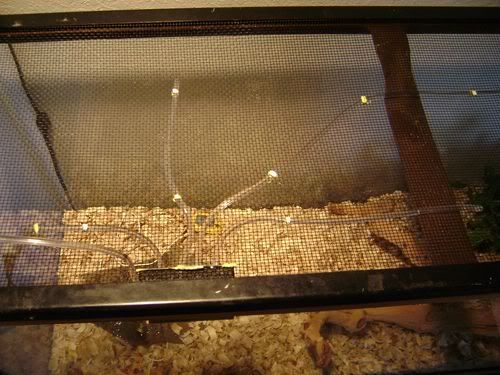
Next comes the easy part. Maping out your areas where you want your water drops to be landing. I chose a simple design using a 4 way gang valve. The purpose of the valve is to allow multiple hookups to 1 air pump. Instead of air being pumped through this device, it'll be substituted with water.
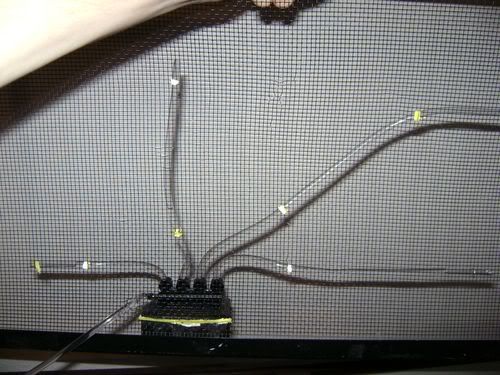
Cut varies lengths of tubing according to how you want your layout to be. Fasten to the top of the screen using twist-ties. Attach tubing to your gang valve.
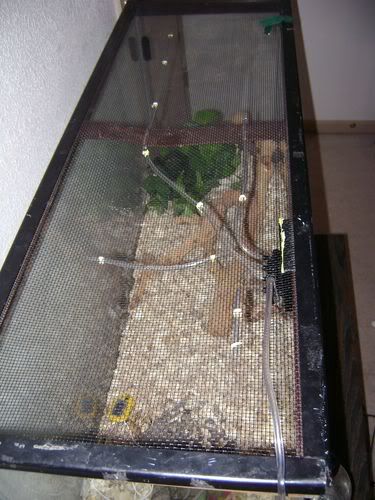
Now you can take the tubing coming out of the top of your bottle and feed it into the cage and hook it up to the side of the gang valve.
Fill your bottle with water and plug her in.
You can control the amount of drops using little individual knobs located on the gang valve. I chose a nice steady drop of water every 2-3 seconds.
You may also hook your aquarium pump up to a digital timer so that the pump isnt on all the time feeding water in. Have it only do it during the day time while your heat source is on.
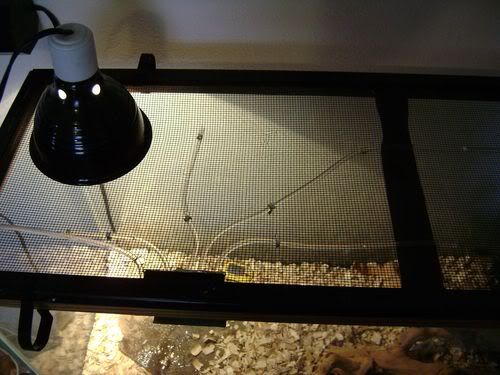
Yes I understand that its water drops, not mist, but if the drops fall onto a flat surface such as a slat rock or something, then the heat from your heat source will evaporate the water making some great humidity. My directions a little vague but hopefully its a simple project. If you have any questions, just ask.
Purpose: Raises the humidity levels in the enclosure without using a pesky spray bottle. I work long hours mostly days/nights and I dont have to much time to be misty the cages to get the humidity up. In the past, I used this same idea, but I decided to modify that idea to create something slightly unusual.
I call it... The Lazy Man's Humidifer
Complexity: 3 out of 10 stars
Materials:
1 - $5 Generic Aquarium Air Pump
1 - $1 8' Clear Aquarium Hose
1 - $5 Digital Outlet Timer
1 - $2 4 way Aquarium Gang Valve
1 - $1 Epoxy Glue
1 - Free Coke bottle (Drink the coke obviously haha, 24 oz., 1 liter, or 2 liter works great. If you have a big cage, go for a milk jug or bigger)
So basically heres how it works...
Heres the coke bottle hooked up to the aquarium pump. The air thats being pushed through the tubing from the aquarium pump goes into the coke bottle. Theres an outlet hole in the top of the bottle. Since the air has no where to go, it forces the water up through the top hose into the cage.
Directions: Take an ordinary coke bottle. Drill 1 hole in the top lid of the bottle, then 1 more hole in the side of the bottle preferably towards the top. (As shown). Feed a piece of tubing into the top of the cap so that the tubing goes into the bottle all the way to the base of the bottle. The tubing coming from the cap has to touch the bottom of the bottle because thats where the water will be pushed up through the tubing.
Next, take another piece of tubing in feed it into the side of the bottle. The tubing going into the side of the bottle doesn't matter if its touching the bottom of the bottle like the top, or if its just a few inches inside of the bottle. This is the piece where the air will be constantly fed into the bottle.
Mix up your epoxy glue and glue the tubing around the 2 holes so that theres no air holes. Let dry for a good 15-30 mins.
Next comes the easy part. Maping out your areas where you want your water drops to be landing. I chose a simple design using a 4 way gang valve. The purpose of the valve is to allow multiple hookups to 1 air pump. Instead of air being pumped through this device, it'll be substituted with water.
Cut varies lengths of tubing according to how you want your layout to be. Fasten to the top of the screen using twist-ties. Attach tubing to your gang valve.
Now you can take the tubing coming out of the top of your bottle and feed it into the cage and hook it up to the side of the gang valve.
Fill your bottle with water and plug her in.
You can control the amount of drops using little individual knobs located on the gang valve. I chose a nice steady drop of water every 2-3 seconds.
You may also hook your aquarium pump up to a digital timer so that the pump isnt on all the time feeding water in. Have it only do it during the day time while your heat source is on.
Yes I understand that its water drops, not mist, but if the drops fall onto a flat surface such as a slat rock or something, then the heat from your heat source will evaporate the water making some great humidity. My directions a little vague but hopefully its a simple project. If you have any questions, just ask.

