- Messages
- 612
- Location
- Missouri
The only cage that you can build for less than $25!
Dimensions: 36"x18"x18"
Supplies:
1 - 8'x4' .5" Thick Plank of Particle Board $7
3 - 10' 2x4's $6
1 - 8' 1x2 $1.50
1 - "Miss Mixed .5 Gallon Paint $?
(You can find this as cheap as $1 up to $8)
1 - Primer $?
1 - Bathroom Caulking $.99
1 - Screws (Drywall 1") $3.25
1 - Pet Screening Remnant $3
1 - .25" Galvanized Mesh Remnant $2
________
= $24.74 (Without Paint)
Tip with finding your supplies: "When purchasing supplies, don't buy everything in bulk if you won't use it in the future. Find remnants from stores by simply asking them if you can have only a certain portion, or if they have any scrap areas where you can find what you need."
Tools Required:
Jigsaw (I used bigger machinery to make this cage, but for a simple home use project, a simple jigsaw will do just fine as long as you make sure to draw a nice big black line as a guide when cutting out your pieces of wood.)
Phillips Head Electric Screwdriver
Paintbrushes
Wire Cutters
Staple Gun and Staples
Scissors
I'm going to make this tutorial a bit simplistic due to the fact that if you have read any of my other tutorials, you'll realize how easy it is to actually construct a basic Reptile Enclosure.
1. Getting to know your Wood
Ladies and Gentlemen, we are working with particle board here. Its nothing fancy, but it does a great job at doing what we want it to do. Keep out reptiles inside a safe area while maintaining perfect conditions for the reptile.
With that simple note being said, lets get to work!
2. All about the frame.
The frame is constructed out of your basic 2x4's. Now, you must realize when doing measurements, that the phrase 2x4 is misleading. A "2x4" is actually 1.5"x3.5". When your figuring out your dimensions in order to build this cage, you have to keep that vital piece of information in mind, otherwise your cage won't look the same as you wanted it to do.
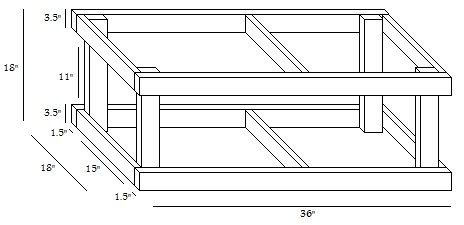
3. The bottom stand.
Heres a simple diagram I constructed which shows you the placement of the 2x4's as well as the measurements that they need to be cut to. If your final product does not look like whats pictured, then obviously something needs a change")
3. The Top Portion of the Enclosure (The Actual Enclosure Itself)
You need to cut out 5 total planks of wood.
Back - 36"x18"x18"
Side Left - 18"x18"x18"
Side Right - 18"x18"x18"
Top - 36"x18"x18"
Bottom 36"x18"x18"
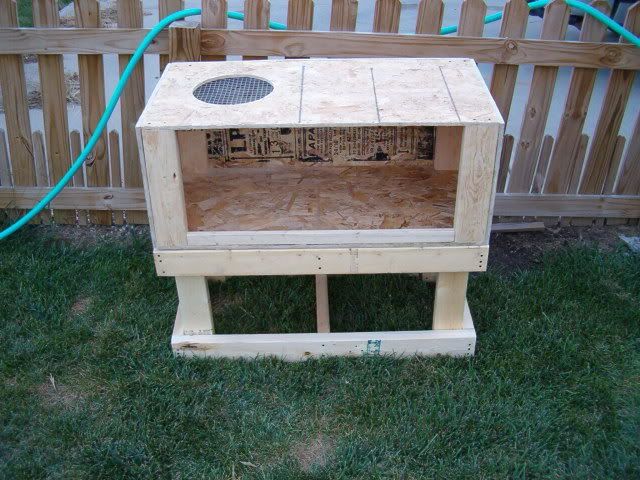
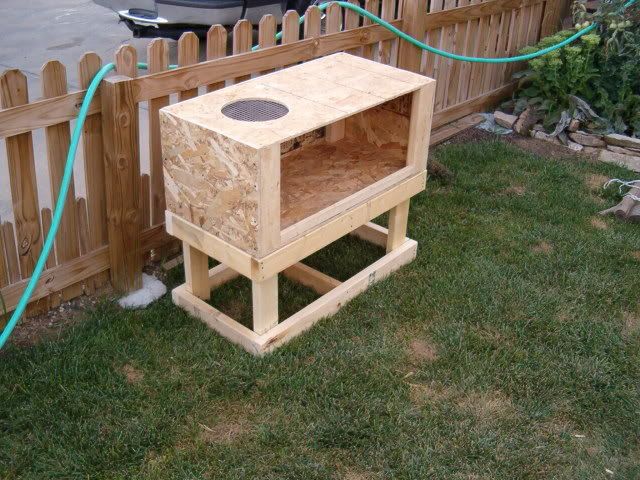
4. The structure.
The structure of the cage is quite simple. I took my 2x4 and cut out 4 18" pieces. This will be the stabilizers for the 4 corners of the cage. Screw all 4 pieces onto the edges of the cage as shown. Then screw on the top piece, the back, then the 2 sides. This gives you a simple box as shown in these pictures.
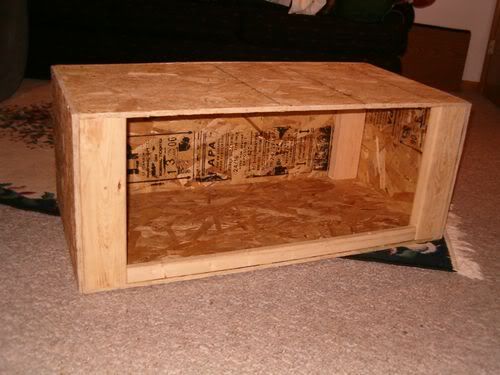
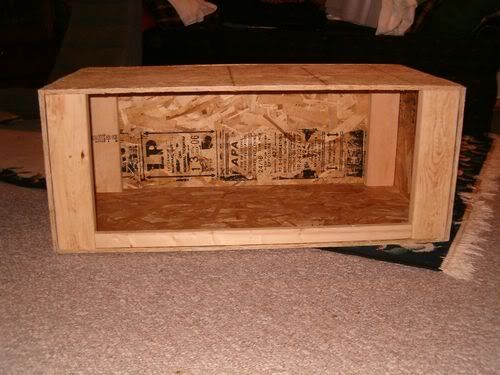
The actual cage dimensions are 37"x18"x18".
(Since the 2 sides are .5" and overlap the 36" top and bottom. 36"+.5"+.5"= 37" total inches)
5. The "Lip"
When I say the Lip, I'm referring to the little 1x2 thats below the door in brown. This little board will add support of the henge's as well as provide a little wall to keep in any particles that you might have as substrate. Just take the 1x2 and cut a 29" piece. It'll then measure 29"x.5"x1.5"
(The real dimensions of a 1x2 is .5"x1.5")
Simple secure the lip by taking some of the 1" drywall screws and screwing the wood to the bottom of the cage on the bottom plank.
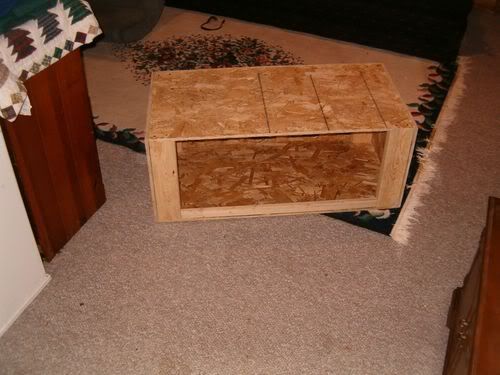
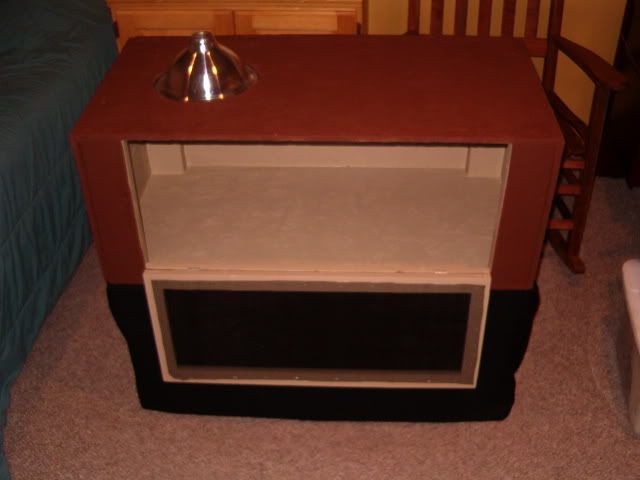
6. Light Placement and cutout
I chose to place the heat lamp over the left portion of the enclosure. This gives the reptile a basking area, and a cool side without any light. First thing you do is to take the bell portion of the heatlamp shade and place it on top of the cage over the area you want cutout. Trace a line around the heatlamp shade and cutout using your jigsaw. After the hole is cut out, take your Galvanized Mesh and cutout the right size to fit over your heatlamp hole while still allowing some slack of the mesh to be stapled onto the enclosure to secure it. I stapled the mesh to the inside of the cage to hide the mesh as best as I can.
Refer back up to Number 3 for pictures of the mesh and refer to Number 6 for pictures of the dome fitting into the cutout portion.
6. The door.
The door is constructed using the purchased 8' 1x2. The dimensions of the door measure 29"x15.5" (Length, Height). Screw together.
Cut out a piece of screening and staple to the back of the door leaving little space in between each staple. The farther apart your staples are, the bigger the chance that your reptile will escape! Screw onto the lip using your choice of henge's. The pressure of the door will hold itself in place. Though you may want to look into a lock latch to keep any unwanted "pests" from reaching your pet reptile.
7. Painting
This is pretty simple. Just take your primer, prime everything! I prefer using Kilz Primer because it does a fine job at sealing and preventing any warping, water damage, etc. After you prime, paint using the "Miss Mixed Paint".
Note: "Miss Mixed Paint is simple paint that customers have returned to hardware stores, or that the employees messed up while mixing. Its never been used, only issue is that it didn't match the color they wanted. So, they mark down the paint to a really cheap price..."
For paints, I prefer any Exterior Latex Paint.
Allow 2-3 days of air drying in a well ventilated room/area.
9. Caulking.
Take your cheap bathroom $.99 cent caulking and put a simple bead inside the cage along the edges and corners to prevent anything coming in or going out. Let dry for a few hours.
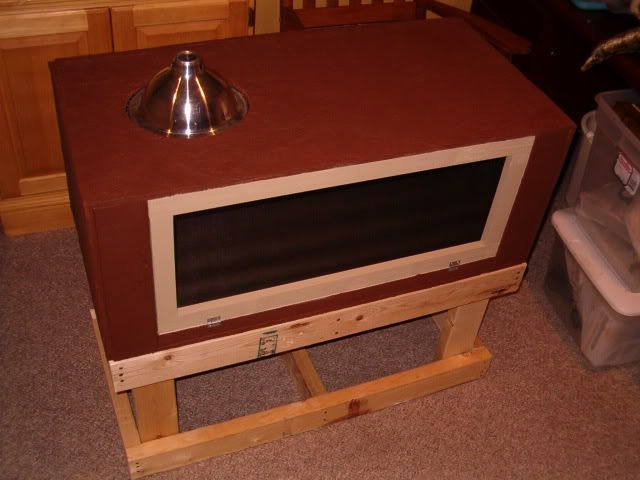
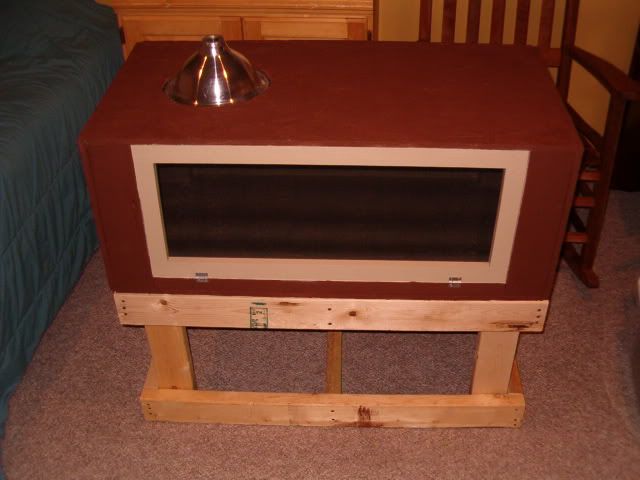
9. Put it all together on the stand.
All done!
Dimensions: 36"x18"x18"
Supplies:
1 - 8'x4' .5" Thick Plank of Particle Board $7
3 - 10' 2x4's $6
1 - 8' 1x2 $1.50
1 - "Miss Mixed .5 Gallon Paint $?
(You can find this as cheap as $1 up to $8)
1 - Primer $?
1 - Bathroom Caulking $.99
1 - Screws (Drywall 1") $3.25
1 - Pet Screening Remnant $3
1 - .25" Galvanized Mesh Remnant $2
________
= $24.74 (Without Paint)
Tip with finding your supplies: "When purchasing supplies, don't buy everything in bulk if you won't use it in the future. Find remnants from stores by simply asking them if you can have only a certain portion, or if they have any scrap areas where you can find what you need."
Tools Required:
Jigsaw (I used bigger machinery to make this cage, but for a simple home use project, a simple jigsaw will do just fine as long as you make sure to draw a nice big black line as a guide when cutting out your pieces of wood.)
Phillips Head Electric Screwdriver
Paintbrushes
Wire Cutters
Staple Gun and Staples
Scissors
I'm going to make this tutorial a bit simplistic due to the fact that if you have read any of my other tutorials, you'll realize how easy it is to actually construct a basic Reptile Enclosure.
1. Getting to know your Wood
Ladies and Gentlemen, we are working with particle board here. Its nothing fancy, but it does a great job at doing what we want it to do. Keep out reptiles inside a safe area while maintaining perfect conditions for the reptile.
With that simple note being said, lets get to work!
2. All about the frame.
The frame is constructed out of your basic 2x4's. Now, you must realize when doing measurements, that the phrase 2x4 is misleading. A "2x4" is actually 1.5"x3.5". When your figuring out your dimensions in order to build this cage, you have to keep that vital piece of information in mind, otherwise your cage won't look the same as you wanted it to do.
3. The bottom stand.
Heres a simple diagram I constructed which shows you the placement of the 2x4's as well as the measurements that they need to be cut to. If your final product does not look like whats pictured, then obviously something needs a change
3. The Top Portion of the Enclosure (The Actual Enclosure Itself)
You need to cut out 5 total planks of wood.
Back - 36"x18"x18"
Side Left - 18"x18"x18"
Side Right - 18"x18"x18"
Top - 36"x18"x18"
Bottom 36"x18"x18"
4. The structure.
The structure of the cage is quite simple. I took my 2x4 and cut out 4 18" pieces. This will be the stabilizers for the 4 corners of the cage. Screw all 4 pieces onto the edges of the cage as shown. Then screw on the top piece, the back, then the 2 sides. This gives you a simple box as shown in these pictures.
The actual cage dimensions are 37"x18"x18".
(Since the 2 sides are .5" and overlap the 36" top and bottom. 36"+.5"+.5"= 37" total inches)
5. The "Lip"
When I say the Lip, I'm referring to the little 1x2 thats below the door in brown. This little board will add support of the henge's as well as provide a little wall to keep in any particles that you might have as substrate. Just take the 1x2 and cut a 29" piece. It'll then measure 29"x.5"x1.5"
(The real dimensions of a 1x2 is .5"x1.5")
Simple secure the lip by taking some of the 1" drywall screws and screwing the wood to the bottom of the cage on the bottom plank.
6. Light Placement and cutout
I chose to place the heat lamp over the left portion of the enclosure. This gives the reptile a basking area, and a cool side without any light. First thing you do is to take the bell portion of the heatlamp shade and place it on top of the cage over the area you want cutout. Trace a line around the heatlamp shade and cutout using your jigsaw. After the hole is cut out, take your Galvanized Mesh and cutout the right size to fit over your heatlamp hole while still allowing some slack of the mesh to be stapled onto the enclosure to secure it. I stapled the mesh to the inside of the cage to hide the mesh as best as I can.
Refer back up to Number 3 for pictures of the mesh and refer to Number 6 for pictures of the dome fitting into the cutout portion.
6. The door.
The door is constructed using the purchased 8' 1x2. The dimensions of the door measure 29"x15.5" (Length, Height). Screw together.
Cut out a piece of screening and staple to the back of the door leaving little space in between each staple. The farther apart your staples are, the bigger the chance that your reptile will escape! Screw onto the lip using your choice of henge's. The pressure of the door will hold itself in place. Though you may want to look into a lock latch to keep any unwanted "pests" from reaching your pet reptile.
7. Painting
This is pretty simple. Just take your primer, prime everything! I prefer using Kilz Primer because it does a fine job at sealing and preventing any warping, water damage, etc. After you prime, paint using the "Miss Mixed Paint".
Note: "Miss Mixed Paint is simple paint that customers have returned to hardware stores, or that the employees messed up while mixing. Its never been used, only issue is that it didn't match the color they wanted. So, they mark down the paint to a really cheap price..."
For paints, I prefer any Exterior Latex Paint.
Allow 2-3 days of air drying in a well ventilated room/area.
9. Caulking.
Take your cheap bathroom $.99 cent caulking and put a simple bead inside the cage along the edges and corners to prevent anything coming in or going out. Let dry for a few hours.
9. Put it all together on the stand.
All done!